USB Armory
Introduction
Launched in 2014, USB Armory is a small and portable USB-sized personal computer created by Andrea Barisani [1]. Originally intended to be produced as a secure data store, USB Armory became a versatile device used as a full-scale computer for developing, running different applications, storing information safely, and testing security. With its hardware sufficient as a computer, it can be configured on an installed Linux system that boots and thus powers up when plugged into any computer, for example, so that data not only ends up on an encrypted partition but is automatically re-encrypted when transferred. USB Armory uses many security features that are responsible for encrypting and decrypting data, using different hashing functions and unique keys. With the USB Armory, software, and hardware will be secured. [2] .
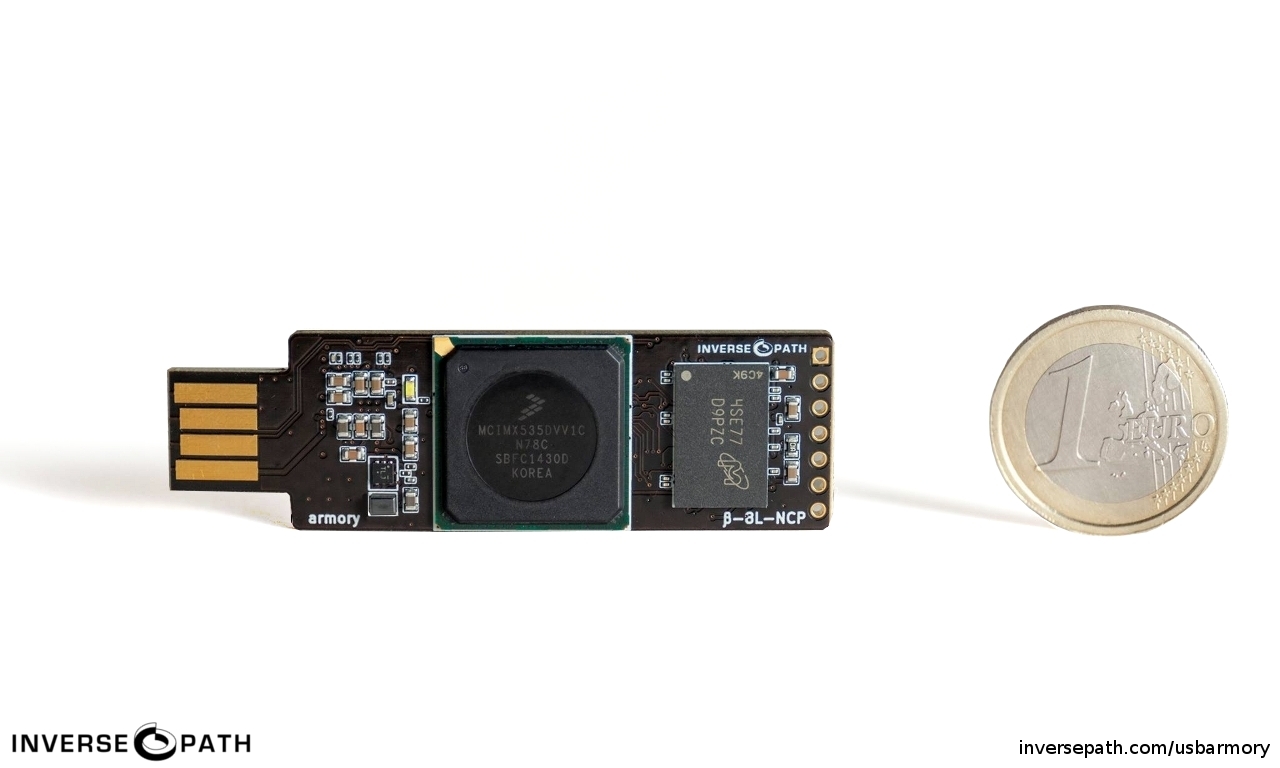
There are currently two versions of USB Armory:
- USB Armory MK I.
- USB Armory MK II.
USB Armory MK II was developed after some design and security issues in the USB Armory MK I were detected. The Mk II model introduces significant improvements, including more processing power, enhanced security with additional secure elements, expanded storage options, Bluetooth connectivity, and support for debugging accessories.
USB Armory MK I Hardware
- NXP i.MX53 ARM® Cortex™-A8 800MHz, 512MB DDR3 RAM
- USB host powered (<500 mA) device with compact form factor (65 x 19 x 6 mm)
- ARM® TrustZone®, secure boot + storage + RAM
- microSD card slot
- 5-pin breakout header with GPIOs and UART
- customizable LED, including secure mode detection
- excellent native support (Android, Debian, Ubuntu, Arch Linux)
- USB device emulation (CDC Ethernet, mass storage, HID, etc.)
- Open Hardware & Software [4]
USB Armory MK II Hardware
- NXP i.MX6UL/i.MX6ULZ ARM® Cortex™-A7 900MHz, 512MB/1GB DDR3 RAM
- USB host powered (<500 mA) device with compact form factor (65 x 19 x 6 mm)
- ARM® TrustZone®, secure boot + storage + RAM
- Secure elements Microchip ATECC608A and NXP A71CH
- Internal 16GB eMMC + external microSD
- U-blox ANNA-B112 Bluetooth module
- Bebug accessory support for UART, GPIO, SPI, I²C, CAN breakout
- Customizable LEDs, including secure mode detection
- Supported by vanilla Linux kernels and distros
- USB device emulation (CDC Ethernet, mass storage, HID, etc.)
- Open Hardware & Software [5]
Software
- Native Linux support – creating boot images is easy
- Precompiled images are available for Debian 9 (Stretch) and Arch Linux, with more on the way
- USB device emulation (CDC Ethernet, mass storage, HID, etc.) [6]
How to connect
- USB Connectivit: HS USB 2.0 On-The-Go (OTG) with device emulation
- Communication: TCP/IP communication via CDC Ethernet emulation
- Flash drive functionality: Mass storage device emulation
- Serial communication: over USB or physical UART
- Stand-alone mode: with dedicated host adapter [7]
Background
The USB Armory project was initiated by Inverse Path, a renowned security consultancy acquired by F-Secure in 2007. Currently, Inverse Path is part of WithSecure Corporation [8]. The USB Armory, born as the company's first hardware project, was crowdfunded [9] and operates under the CERN Open Hardware License [10]. The motivation behind its development was the team's quest to create a pocket-sized, open-source encryption device, filling a gap in the market where transparency and security were lacking.
Initial Design Goals
- Compact USB Powered Device
- Fast CPU and generous RAM
- Secure Boot
- Standard Connectivity over USB
- Familiar Developing and Executing Environment
- Open Design
Scopes Of Application
- Hardware Security Module (HSM)
- File storage with advanced features such as automatic encryption, virus scanning, host authentication, and data self-destruct using Interlock.
- OpenSSH client and agent for untrusted hosts (kiosk).
- Router for end-to-end VPN tunneling, Tor.
- Password manager with an integrated web server using Armory Pass.
- Electronic wallet (e.g. pocket Bitcoin wallet) using Electrum Bitcoin wallet.
- Authentication token.
- Portable penetration testing platform.
- USB Firewall.
- Low level USB security testing [11].
Application Projects and Implementation
Some available software projects and Proof of Concepts (PoCs) are:
- GoKey: It can function as a smart card, offering compatibility with the OpenPGP protocol for encryption and decryption, and the FIDO U2F authentication standard, through the open-source software GoKey [12].
- Interlock and Armory-Drive: The USB Armory’s wiki offers two dedicated software solutions for file encryption. The Interlock [13] application serves as a user-friendly front-end for encrypting files, facilitating the process for secure data protection. In addition, the armory-drive [14] unikernel enables encrypted USB Mass Storage interfacing for microSD cards, ensuring data security during storage and transfer [15].
- Electrum Bitcoin Wallet: the device is compatible with the Electrum Bitcoin Wallet [16], which can be used out of the box to turn a USB Armory into a Bitcoin wallet.
- Armory Pass: it can also be used as a password manager using MichaelWeissbacher’s Armory Pass [17]. The USB Armory in combination with the tool Armory Pass, turns into a portable password manager that does not require manually copying any password.
Getting Started
The USB Armory requires a valid operating system to boot either from the external MicroSD card or the internal eMMC (USB Armory Mk II). The following describes the installation on a MicroSD card:
Downloading an Operating System
To obtain a valid operating system image, there are essentially two options for the USB Armory. A precompiled operating system binary provided by the manufacturer can be downloaded, or the manufacturer's instructions can be followed to manually create and compile an Linux Debian based operating system image according to individual requirements.[18]
The official operating system for the USB Armory is Debian Linux (bullseye). However, images of other Linux distributions as well as an image of the SkiffOS operating system for the USB Armory Mk II are also offered by the manufacturer. The list of images available from the manufacturer as of October 2024 is as follows:[19]
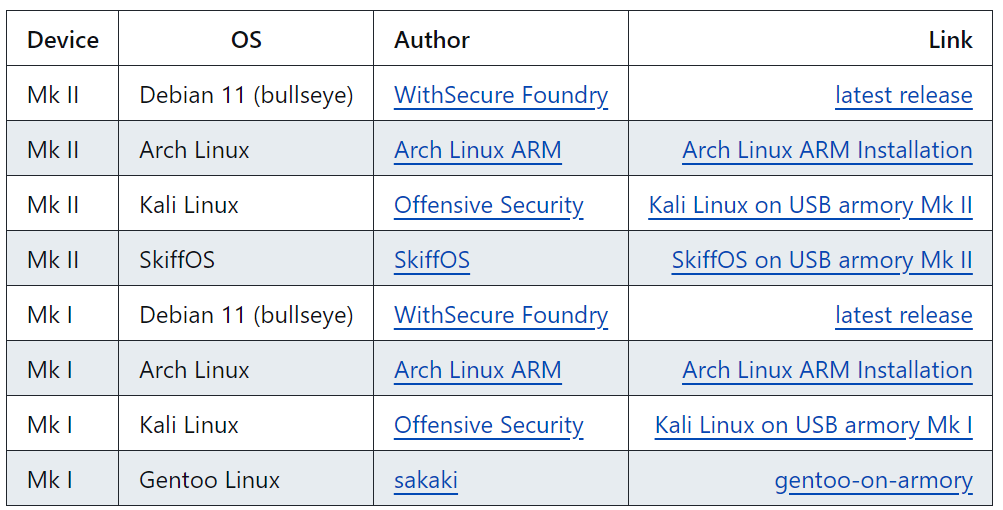
You can find the following Pre-Image files at this link: https://github.com/usbarmory/usbarmory/wiki/Available-images
Installation of the Operating System
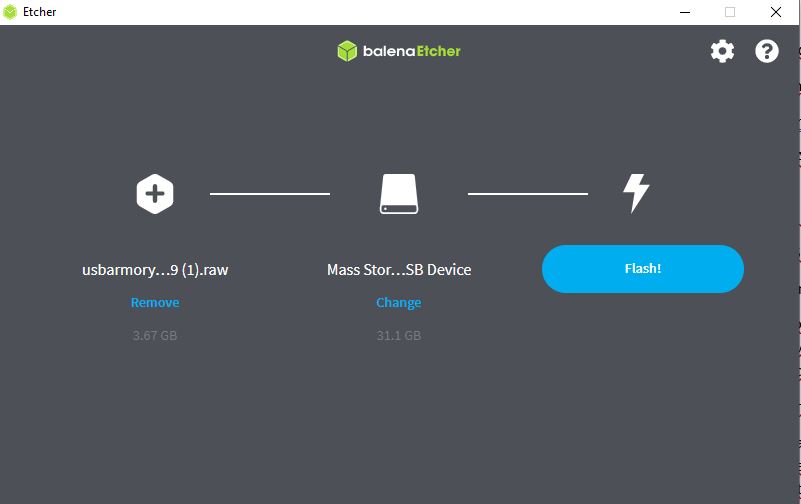
To boot the USB Armory from a MicroSD card, the operating system image must be written to the card. The uncomressed raw operating system image file can be written to a MicroSD card as follows:
# Linux (verify target from terminal using dmesg):
sudo dd if=<path to raw file> of=/dev/sdX bs=1M conv=fsync
# Mac OS X (verify target from terminal with diskutil list):
sudo dd if=<path to raw file> of=/dev/rdiskN bs=1m
# On Windows, and other OS, alternatively the Etcher utility can be used.
You can download Etcher at this link: https://etcher.balena.io/
Initial Operation of the Operating System
Once the USB Armory with a flashed operating system is connected to a computer's USB interface, it immediately starts booting by default. After the USB Armory system has booted, it uses an Ethernet-over-USB emulation (CDC Ethernet) to communicate with the computer to which it is connected. The USB Armory assigns itself the IP address 10.0.0.1 and uses 10.0.0.2 as the default gateway. The connection can be established via SSH to 10.0.0.1, using the default username usbarmory and the password usbarmory.
NOTE: A DHCP server runs by default. Alternatively, the IP address of the host interface can be statically set to 10.0.0.2/24.[22]
It is known that the USB Armory is not automatically recognized as a network adapter on certain Microsoft Windows installations and does not appear under Control Panel\Network and Internet\Network Connections. This is most likely caused by an issue with the RNDIS driver, which the USB Armory uses to establish a network connection over USB.
A possible solution to this problem is to use a virtual machine with USB passthrough and Linux as the operating system, as Linux natively provides the required usbX driver. Another possible solution is to follow the current troubleshooting suggestions provided by the manufacturer, which mainly focus on installing alternative drivers or enabling the use of already installed alternative drivers.[23] You can find current troubleshooting suggestions from the manufacturer under the section "Setup & Connection Sharing: Windows 7, 8, 10" at the Link https://github.com/usbarmory/usbarmory/wiki/Host-communication#setup--connection-sharing-windows-7-8-10.
To enable the USB Armory to access the Internet, the host machine must be configured as a gateway. On Linux, this can be achieved as follows:
# look up the name of the USB virtual Ethernet interface which was created by the USB Armory
ifconfig
# bring the USB virtual Ethernet interface up
/sbin/ip link set usb0 up
# set the host IP address
/sbin/ip addr add 10.0.0.2/24 dev usb0
# enable masquerading for outgoing connections towards wireless interface
/sbin/iptables -t nat -A POSTROUTING -s 10.0.0.1/32 -o wlan0 -j MASQUERADE
# enable IP forwarding
sudo sysctl -w net.ipv4.ip_forward=1
#connect to USB Armory via ssh - password: USB armory
ssh usbarmory@10.0.0.1
Armory Pass
Armory Pass is a password manager for USB Armory, that function as a web-based password manager. It works by simulating a button click on the website and after "clicking the button" the password will be written in the password field.[24].
To configure it:
On The USB Armory:
1. Clone Armory Pass from:https://github.com/mweissbacher/armory-pass
2. Download Python2 since Armory Pass works only with Python2*:
.) sudo apt install python2
3. Install PIP:
  .) curl https://bootstrap.pypa.io/pip/2.7/get-pip.py --output get-
     pip.py
  .) sudo python2 get-pip.py
4. Install Cherrypy:
.) pip install cherrypy
5. Install Websocket: Ws4py
  .) git clone git@github.com:Lawouach/WebSocket-for-Python.git
  .) python2 setup.py install
  .) pip install ws4py
  .) easy_install ws4py
6. Edit the file "Background.js" by changing the IP address to 127.0.0.1.
7. Change the Permissions for the files "Background.js" and "manifest.js".
8. Add the websites and your Passwords to "Password_store.js".
9. Run "ws.py" and "secret.js" file will be created.
.) python2 ws.py
Locally
1. Clone Armory Pass from:https://github.com/mweissbacher/armory-pass
2. Download Google Chrome since Armory pass works only with chrome extension:
  .) wget https://dl.google.com/linux/direct/google-chrome-stable_current_amd64.deb
  .) sudo apt install ./google-chrome-stable_current_amd64.deb
  .) sudo apt install google-chrome-stable
3. Create "secret.js" and copy the contents from the "secret.js" on the USB Armory and paste it into the locale "secret.js".
4. Edit the permissions locally as on the USB Armory.
5. Edit "Background.js" and add the IP address 10.0.0.1
6. Add Armory Pass Extension to Chrome and open the page you want to write your password on. 7. Simulate clicking the button:
.) python2 test_press.py
INTERLOCK
The INTERLOCK application is an encryption frontend specifically developed for use with the USB Armory Mk I and MK II, but it can also be used on other devices. The main interface consists of a web-based file manager that runs on an encrypted partition and is hosted by a JSON application server (e.g., on the USB Armory). Through this file manager, files can be uploaded to or downloaded from the partition encrypted using Linux Unified Key Setup (LUKS). Additionally, it supports symmetric and asymmetric cryptographic operations on individual files.[26]
Downloading INTERLOCK
The INTERLOCK application is loaded as an image onto the MicroSD card of the USB Armory. To obtain a valid application image, there are essentially two options for the USB Armory. A precompiled application image in the form of a binary can be downloaded from the manufacturer, or the manufacturer's instructions can be followed to manually create and compile an application image according to individual requirements.[27]
Installation of INTERLOCK
To use the INTERLOCK application, its image must be written to the MicroSD card of the USB Armory. The extracted application image can be written to a MicroSD card as follows:
# Linux (verify target from terminal using dmesg):
sudo dd if=interlock-usbarmory-v2020.03.05.raw of=/dev/sdX bs=1M conv=fsync
# Mac OS X (verify target from terminal with diskutil list):
sudo dd if=interlock-usbarmory-v2020.03.05.raw of=/dev/rdiskN bs=1M
# On Windows, and other OS, alternatively the Etcher utility can be used.
You can download Etcher at this link: https://etcher.balena.io/
Initial Operation of INTERLOCK
Once the USB Armory with the INTERLOCK application installed is connected to a computer's USB interface, it behaves exactly as described in section Initial Operation of the Operating System. By default, the USB Armory immediately starts booting. After the system of the INTERLOCK application on the USB Armory has booted, it uses an Ethernet-over-USB emulation (CDC Ethernet) to communicate with the computer to which it is connected. The USB Armory assigns itself the IP address 10.0.0.1. The web interface of the INTERLOCK application can now be accessed using a web browser at the link https://10.0.0.1, with the default username armory and the default password usbarmory.

NOTE: A DHCP server runs by default. Alternatively, the IP address of the host interface can be statically set to 10.0.0.2/24.
If the USB Armory is not automatically recognized as a network adapter on certain Microsoft Windows installations and does not appear under Control Panel\Network and Internet\Network Connections, proceed as described in section Initial Operation of the Operating System.
Alternatives
- Ledger: develops hardware to secure crypto assets by ensuring the end user’s private keys are safe from theft.
- TREZOR: is an open-source bitcoin wallet.
- Nitrokey: This USB device offers an open source and open hardware design that is developed for email encryption, storing encrypted data, encrypting hard disk and files, managing keys and certificates, and server administration with SSH.
- Wookey: This project is fully open source and open hardware is working on prototyping a secure and trusted USB storage device with data encryption and secure firmware update with secure boot[28].
MK II: Debug Accessory Board
The Debug Accessory Board [29], is an optional accessory for the newest version, the MK II. Like the USB Armory, the board is licensed under CERN Open Hardware License.
The Mk II has a USB Type-C port that supports the USB-C debug accessory mode. This mode allows the use of the port for analog/debug signals. With this feature, the USB Armory Mk II breaks out connections for UART, SPI, I²C, CAN (pre-transceiver), and GPIOs to/from its processor.
The debug accessory board makes it easy to access UART and GPIO signals via USB, without needing probes. It uses an FTDI FT4232H, allowing direct access to the USB Armory Mk II serial console using only USB cables, with no need for extra wires or probes. Other interfaces are accessible through dedicated holes.
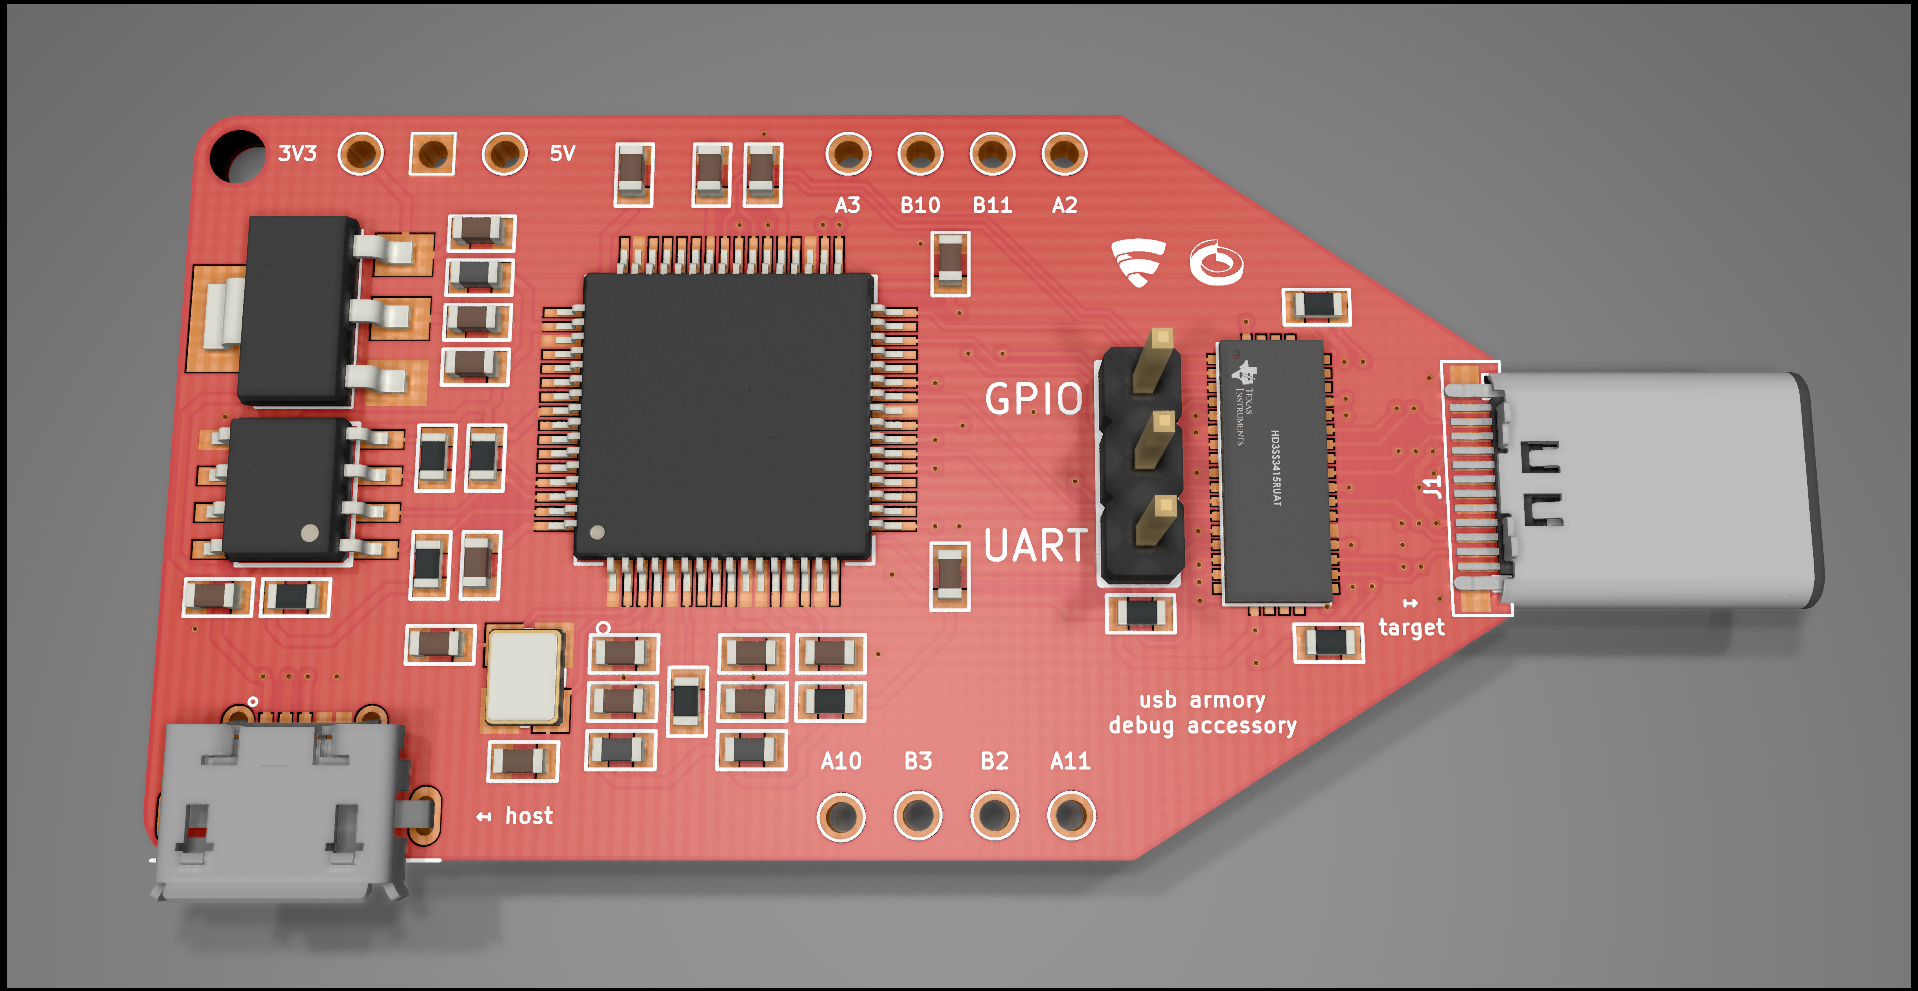
The board is 22x57x12 mm, including the USB-C connector.
Hardware Used
References
- ↑ Andrea Barisani. Forging the USB armory, https://www.youtube.com/watch?v=bE5licRHMFs,2014.
- ↑ NXP Community, Introducing USB armory, an Open Source Hardware Freescale i.MX53 Dongle , https://community.nxp.com/t5/i-MX-Solutions-Knowledge-Base/Introducing-USB-armory-an-Open-Source-Hardware-Freescale-i-MX53/ta-p/1126823, 2014
- ↑ Inverse Path, OPEN SOURCE FLASH-DRIVE SIZED COMPUTER, https://inversepath.com/usbarmory_mark-one.html
- ↑ Inverse Path, Hardware, https://inversepath.com/usbarmory_mark-one.html
- ↑ Inverse Path, Hardware, https://inversepath.com/usbarmory.html
- ↑ Andrea Barisani, MK II Introduction, https://github.com/f-secure-foundry/usbarmory/wiki/Mk-II-Introduction#software
- ↑ Inverse Path, How to Connect, https://inversepath.com/usbarmory_mark-one.html
- ↑ WithSecure: USB Armory https://www.withsecure.com/en/solutions/innovative-security-hardware/usb-armory
- ↑ CrowdSupply: USB armory https://www.crowdsupply.com/inverse-path/usb-armory
- ↑ CERN Open Hardware License https://cern-ohl.web.cern.ch/
- ↑ Inverse Path, Applications, https://inversepath.com/usbarmory_mark-one.html
- ↑ GoKey https://github.com/usbarmory/GoKey
- ↑ InterLock https://github.com/usbarmory/interlock
- ↑ Armory-Drive https://github.com/usbarmory/armory-drive
- ↑ USB Armory Drive - Portable Mass Storage Encryption. https://www.scip.ch/en/?labs.20220505.
- ↑ Electrum Bitcoin Wallet https://electrum.org/
- ↑ USB Armory Pass https://github.com/mweissbacher/armory-pass
- ↑ Preparing a bootable image, https://github.com/usbarmory/usbarmory/wiki/Preparing-a-bootable-image
- ↑ Available images, https://github.com/usbarmory/usbarmory/wiki/Available-images
- ↑ Andrea Barisani, Available images, https://github.com/f-secure-foundry/usbarmory/wiki/Available-images
- ↑ balenaEtcher, https://www.balena.io/etcher/
- ↑ USB armory - Debian base image release 20240702, https://github.com/usbarmory/usbarmory-debian-base_image/releases/tag/20240702
- ↑ Host communication, https://github.com/usbarmory/usbarmory/wiki/Host-communication
- ↑ Armory Pass https://github.com/mweissbacher/armory-pass
- ↑ Sunsetting Python 2 https://www.python.org/doc/sunset-python-2/#:~:text=The%20sunset%20date%20has%20now,when%20we%20released%20Python%202.7.
- ↑ INTERLOCK, https://github.com/usbarmory/interlock
- ↑ INTERLOCK, https://github.com/usbarmory/interlock
- ↑ Jeremy Lefaure. Wookey: Usb devices strike back. https://www.sstic.org/media/SSTIC2018/SSTIC-actes/wookey_usb_devices_strike_back/SSTIC2018-Article-wookey_usb_devices_strike_back-michelizza_lefaure_renard_thierry_trebuchet_benadjila_saV2IIT.pdf
- ↑ Mark II Debug Accessory https://github.com/usbarmory/usbarmory/tree/master/hardware/mark-two-debug-accessory
- ↑ Mark II Debug Accessory https://github.com/usbarmory/usbarmory/tree/master/hardware/mark-two-debug-accessory